
 Wood can turn your grilled food from just okay to something you actually crave.
The type of wood you choose and how you prep it really shape the smoke flavor and can even mess with how your grill behaves. Many people skip steps when seasoning wood, which can lead to uneven heat or bitter, unpleasant smoke
To prepare wood for grilling, you need to choose the right type of wood, cut or split it to the proper size, make sure it has the correct moisture level, and soak or season it based on how you plan to use it.
Each form of wood—logs, chunks, planks—needs something a little different. Logs want splitting and drying. Chunks are best if you size them right. Planks? Gotta soak those before they hit the grill.
Choosing the Right Wood for Grilling

The wood you pick has a direct impact on the flavor you get. Different woods make different smoke, and pairing the right one with your meat or veggies can be the difference between “meh” and “wow.”
Hardwoods vs. Softwoods
You should always choose hardwoods for grilling—never softwoods. Hardwoods come from deciduous trees that shed their leaves each year, and they burn more slowly and evenly. More importantly, they produce a clean, flavorful smoke that enhances food, rather than the harsh, resinous smoke softwoods give off.
Softwoods, like pine or fir, are loaded with resin and sap, so when you burn them, you get thick black smoke and a nasty, bitter taste on your food. Not exactly appetizing.
Hardwoods for grilling include oak, hickory, maple, and fruit woods. They’re dense, burn longer, and give you the kind of steady heat and clean smoke you actually want. Honestly, it’s not even a contest.
Popular Types of Wood for Grilling
Oak wood is super versatile. Burns hot and slow, with a medium smoke flavor that works with beef, pork, chicken—you name it. A lot of people use oak as their main wood.
Hickory is all about strong, bold smoke. It’s awesome for pork ribs, bacon, or brisket, but honestly, it can overpower lighter foods. Go for it with big meats that can handle the punch.
Mesquite is intense. It burns hot and fast and gives off the strongest smoke flavor you’ll find. Great for quick steaks, but go easy—too much mesquite and your food gets bitter.
Apple wood and cherry wood are the sweethearts of fruit woods. Apple is mild and just a little sweet, perfect for pork and chicken. Cherry brings a fruity note and even gives your meat a reddish tint. Both are great with poultry, pork, or fish.
Flavor Profiles by Wood Type
Every wood has its own smoke personality. Some are subtle, some are bold, and not all of them play nicely with every food. Knowing these can really help you nail the flavors you’re after.
| Wood Type | Flavor Strength | Best Used With |
|---|---|---|
| Oak | Medium | Beef, pork, chicken |
| Hickory | Strong | Ribs, brisket, bacon |
| Mesquite | Very Strong | Steaks, beef |
| Apple | Mild-Sweet | Pork, chicken, fish |
| Cherry | Mild-Sweet | Pork, poultry, lamb |
| Maple | Mild | Pork, vegetables |
| Alder | Light | Fish, seafood, vegetables |
Light woods like alder are gentle—they won’t drown out delicate fish. Oak sits in the middle, smoky but not overbearing. Hickory and mesquite? Save them for red meat that can handle the drama.
Blending and Pairing Woods
You can mix different types of wood to create your own flavor combo. Blending lets you balance strong and mild, so you get complexity instead of just one-note smoke.
A favorite move: pair oak with a fruit wood like apple or cherry. Oak gives you a reliable smoke base, and the fruit wood sneaks in a touch of sweetness. It’s a go-to for pork shoulder or chicken.
For pork ribs, try hickory with a bit of apple wood. Hickory brings the BBQ vibe, apple keeps things from getting too heavy. About two-thirds hickory, one-third apple? That’s the sweet spot.
You can even layer woods as you cook. Start with something strong like hickory, then switch to a milder wood like oak after an hour. Keeps the smoke from getting too in-your-face.
Processing and Storing Wood for Grilling

If you want clean burns and just the right amount of smoke, you’ve got to prep your wood. That means drying it down to about 20% moisture, picking between kiln-dried and air-dried, and storing it so it doesn’t get ruined.
Seasoning and Drying Wood
Seasoning is just letting your wood dry out. Fresh-cut wood is way too wet and will mess up your fire. Stack it somewhere dry and sunny with plenty of airflow.
Drying usually takes 6 to 12 months, depending on the wood and the weather. Summer is prime time—low humidity and heat speed things along. Stack it off the ground, maybe on pallets, and leave space so air can get through.
You’ll know it’s ready when the ends crack, it feels lighter, and when you knock two pieces together, you get a hollow sound. Bark should peel off pretty easily at this point.
Kiln-Dried vs. Air-Dried Wood
Kiln-dried wood is dried fast in a big oven, down to 15% moisture or even less. It’s ready in days or weeks, not months. Cleaner burns, less creosote, and you’re good to go right away.
Air-dried wood just sits outside and does its thing. It’s cheaper but takes way longer. Both work, but kiln-dried is more convenient if you’re in a hurry.
Kiln-dried wood burns hotter and puts out less smoke at first, so it’s great for high-heat cooking. Air-dried can hang onto more of its natural flavor, which some people swear by for certain grilling styles.
Splitting, Cutting, and Storage Techniques
Split your wood so it fits your grill. Smaller pieces catch fire quickly and burn hot. Bigger chunks burn longer and give you steady heat. Most grilling wood should be 3 to 6 inches thick.
Cut it to match your firebox. Too long, and it won’t fit—plus, you waste heat. Nobody wants that.
Store your wood in a covered spot, but keep the sides open for airflow. Off the ground is key—moisture is the enemy. A woodshed or covered rack does the trick.
Don’t lean it against your house or seal it up tight. That just traps moisture and invites bugs. Rotate your stash so you use the old stuff first. Hardwoods for grilling like oak, hickory, and maple need to stay dry until you’re ready for action.
Preparing Different Forms of Wood for the Grill

There’s more than one way to grill with wood. Each form—chunks, logs, chips, planks—needs its own kind of prep. Chunks and logs need to be sized and dried right, chips sometimes get soaked, and planks have to be totally saturated.
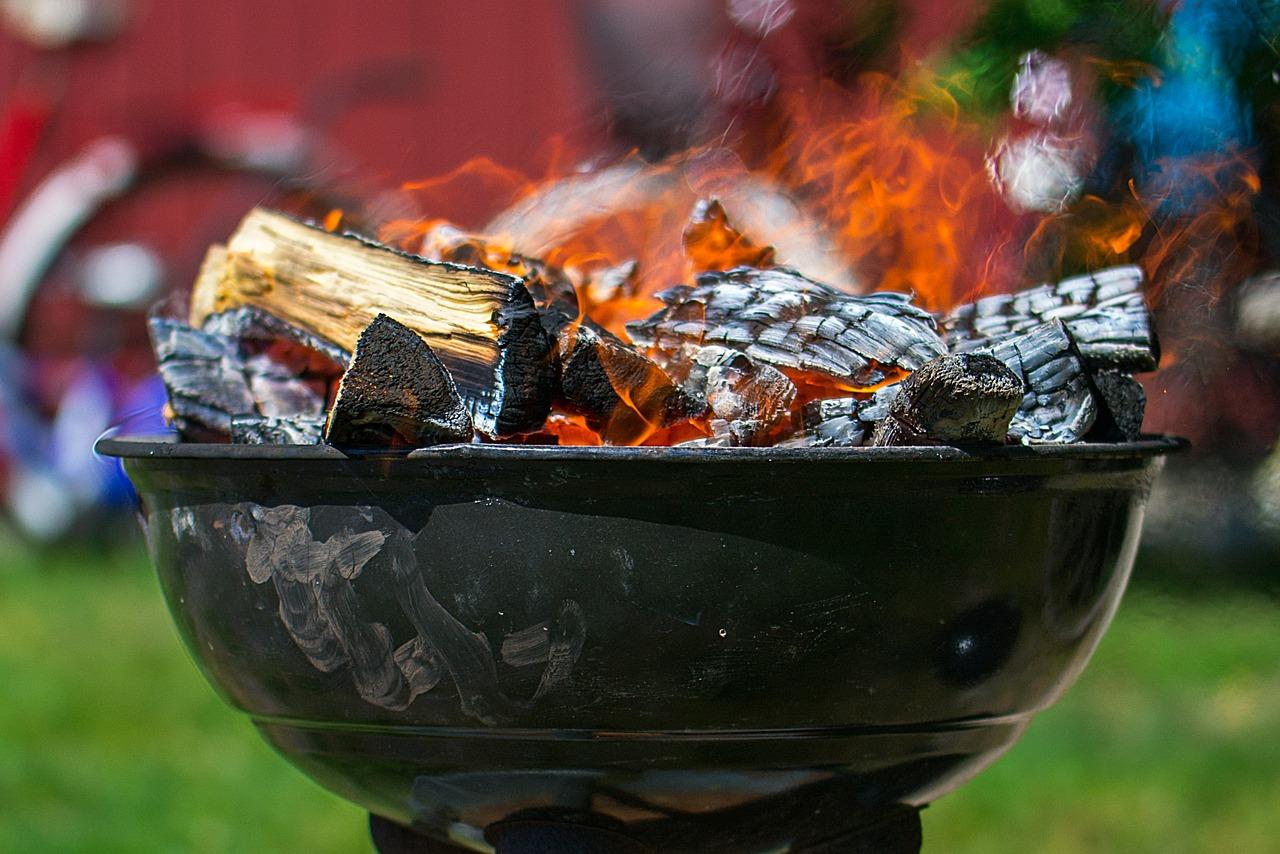
Wood Chunks and Logs
Chunks should be 2 to 4 inches across. That’s big enough to burn slow and steady, not so small they flare up and disappear. Anything smaller than a golf ball? Forget it—they burn up in a flash.
Logs need splitting so they fit your grill. Try for 12 to 18 inches long, and 3 to 4 inches thick. Always dry your wood before grilling—green wood just makes bitter smoke and nobody wants that.
Keep your chunks and logs dry for at least 6 months. You’ll know they’re ready when the bark falls off and you see cracks at the ends. Knock off any loose bark before tossing them on the fire—bark can make extra ash and weird flavors.
Wood Chips: Soaking and Usage
Soaking wood chips is kind of optional. Dry chips catch quick and smoke right away—good for short grilling sessions under 30 minutes.
If you’re cooking longer, soaking helps chips smolder instead of burning up. Let them sit in water for 30 minutes to an hour. Oak chips and other dense ones can soak for up to 2 hours.
Drain them well before you add them to the grill. Too much water just makes steam, not smoke. You can also wrap them in foil pouches with holes poked in the top—works for both soaked and dry chips.
Add chips a bit at a time, not all at once. Toss in a handful every 30 to 45 minutes to keep the smoke going steady without overdoing it.
Grilling Planks: Soaking and Handling
Planks need to be soaked all the way through. Drop your cedar or other wood planks in water for at least an hour. Thicker ones might need 2 to 4 hours.
Put something heavy on top so they stay submerged. A well-soaked plank won’t catch fire and gives off that nice aromatic smoke. It should feel heavy and waterlogged when it’s ready.
Pat the plank dry with a towel before it goes on the grill. Preheat it for 3 to 5 minutes until you see a little smoke, then add your food and close the lid.
Keep a spray bottle handy. If flames pop up, just spritz the edges. Planks that aren’t too charred can be reused—just soak and scrub them between uses.
Techniques for Using Prepared Wood on the Grill

Once your wood’s ready, it’s all about how you use it. Where you put the wood, how you manage smoke, and what temperature you keep—these things make or break the flavor in your food.
Direct and Indirect Grilling with Wood
Direct grilling with wood is all about putting your food right over the burning wood. This is the way to go for quick stuff like steaks, burgers, or even veggies—basically, anything that doesn’t take forever to cook.
With direct grilling, you get that bold smoky flavor and those classic sear marks. Just arrange your wood so you’ve got an even heat zone, and set your food over the hottest part of the fire.
Keep your grill grate about 4 to 6 inches above the wood. That seems to work for most foods, though you might want to experiment a little if you’re after something specific.
Indirect grilling with wood is a different animal. Here, you keep your food away from direct flames, which is a lifesaver for bigger cuts like whole chickens, roasts, or ribs.
Stack your wood on one side and put your food on the other. The smoke can swirl around your food without torching it, which is kind of the whole point.
Some people like to throw a drip pan underneath to catch juices and stop flare-ups. This setup gives you more control over the temperature, and you still get that excellent smoke flavor.
Smoke Management for Maximum Flavor
Getting the smoke right is huge if you want your food to taste good. Too much and you’ll end up with bitter, harsh flavors. Too little, and what’s the point?
You want white or blue smoke when grilling with wood. Blue smoke is this thin, almost invisible stuff—perfect, really. White smoke is fine too, as long as it doesn’t get thick or gray.
If you see thick, dark smoke, your wood’s probably starving for oxygen. Crack open those vents and let the fire breathe. Soaking chips for about 30 minutes can help slow the burn and stretch out your smoke.
Add wood a bit at a time instead of dumping it all in at once. Most of that smoky flavor gets absorbed in the first hour, so don’t bother piling on more wood later—it won’t do much.
Cold Smoking Methods
Cold smoking is a whole different game. You’re using smoke at under 90°F, so the food gets flavored but doesn’t actually cook. This is great for cheese, butter, nuts, or fish.
You’ll need a separate smoke chamber or a special grill attachment for this. Put your wood in a smoke generator or tube, far from the food, and keep it smoldering—not flaming.
Stick an ice pan near the food if you want to keep things chilly. Cold smoking can last anywhere from one to six hours, depending on how smoky you want it.
Keep an eye on your grill temp every half hour and make sure it stays under 90°F. And if you’re cold smoking something you’ll eat as-is, it’s gotta be cured first—food safety isn’t optional.
Safety Precautions and Best Practices

Grilling with wood isn’t rocket science, but you do need to pay attention to safety. Avoid harmful materials, stay on top of fire risks, and deal with wood waste properly. It’s just not worth cutting corners here.
Avoiding Harmful or Treated Woods
Never, ever use treated lumber, painted wood, or anything pressure-treated. Stuff like arsenic and chromium can end up in your food—no thanks. Burning those materials releases toxic fumes you definitely don’t want to breathe in.
Skip softwoods like pine, cedar, or fir, too. They’re loaded with resin and sap, which tastes awful and makes way too much smoke. Plus, creosote from these woods can coat your food with junk you don’t want to eat.
If you see mold, fungus, or rot on any wood, toss it. Burning that stuff can send nasty spores into the air. And if you don’t know where your wood came from, honestly, just don’t risk it.
Stick with hardwoods like oak, hickory, maple, or fruit woods. These burn clean and give you good, safe smoke flavor. Try to buy from suppliers who can actually tell you what you’re getting.
Preventing Flare-Ups and Fire Hazards
Keep your grill at least 10 feet away from your house, deck railings, or anything overhanging. Set it up on something flat and sturdy, and don’t grill where kids or pets are running around.
Never grill inside or in places like garages. That’s just asking for trouble.
Use wood that’s properly seasoned—ideally, you want about 15-20% moisture content. Wet or green wood is unpredictable and makes too much smoke. Add your wood bit by bit to keep things steady and avoid surprise flare-ups.
Have a fire extinguisher, some sand, or a hose nearby, just in case. Heat-resistant gloves and long-handled tools are your friends here. And keep the area clear of anything that could catch fire, like paper or leaves.
Don’t take your eyes off the grill while it’s going. Even a few minutes can be enough for something to go wrong.
Proper Disposal and Reuse
Let all ashes cool completely—give them at least 48 hours. Hot coals can stay dangerous for days, so don’t rush it. Store ashes in a metal container with a lid, not in plastic or paper bags.
Wood ash can actually be good for your garden. It’s got potassium and can raise soil pH, which some plants love. Just spread it thinly or toss it in the compost.
Once you’re sure the ashes are cold, it’s fine to put them in your regular trash. Never dump hot ashes anywhere near buildings or dry grass. Some towns have special disposal for grill ashes, so maybe check your local rules if you’re not sure.
Tips for Enhancing Grilled Food with Wood

The wood you pick and how you use it can take your food from “meh” to seriously memorable. Knowing which woods work with which foods—and dodging the usual mistakes—makes a real difference.
Pairing Woods with Foods
Different woods bring out different smoke flavors. Fruit woods like apple or cherry are mild and a little sweet, which is perfect for chicken, pork, or fish. They don’t overpower delicate stuff.
Hickory is bold—think bacon vibes. It’s a classic for ribs and brisket, but it can be a bit much for poultry or fish if you go overboard.
Mesquite is earthy and intense, and it burns hot and fast. Great for steaks or veggies, but you probably want to skip it for slow cooks or you’ll risk bitter flavors.
Oak is right in the middle—medium smoke, super versatile. Works for almost anything: beef, pork, poultry, seafood. Cedar grilling planks are a favorite for salmon and other fish, thanks to their unique aroma.
Experimenting with Flavor Combinations
Mixing woods can give you flavors you’d never get from just one kind. Start with a base like oak, then toss in some fruit wood or hickory for extra depth.
For example, apple wood with hickory is killer for pork chops—sweet meets savory. Cherry with oak makes a nice, mellow blend for chicken. A 70/30 split of main to accent wood is a good place to start.
Grilling planks soaked in wine, juice, or even herbs can add another layer of flavor. Give them at least an hour to soak. You can also brush on marinades or rubs that work with whatever wood you’re using.
Jot down what you tried and how it turned out. It’s a bit nerdy, but it helps you remember what actually worked—and what to skip next time.
Common Mistakes to Avoid
Using too much wood is the most frequent error. Excessive smoke creates bitter, acrid flavors that can really ruin your food.
Start with small amounts and add more only if it actually seems necessary. It’s easy to overdo it without realizing.
Green or wet wood produces poor smoke flavor and dumps extra moisture into your cook. Always go for properly seasoned wood—aim for a moisture content under 20% if you can.
And please, skip the treated lumber. That stuff releases toxic chemicals when burned, which is the last thing you want near your food.
Don’t mix incompatible woods unless you’ve tested the combo first. Mesquite and delicate fruit woods? Yeah, they almost never play nice together.
Strong woods can totally overpower the subtle ones, so be picky about your blends.
Failing to control temperature is another classic mistake. Wood burns hotter than charcoal, so keep an eye on your grill.
Sudden temperature spikes can char your food before it even cooks through. It’s a bit of a balancing act, but worth it.