
 Baking chicken breasts at 400°F is one of the most reliable methods for getting tender, flavorful results in your kitchen. The high temperature cooks the meat quickly while keeping moisture locked inside.
Boneless, skinless chicken breasts that are about 1 inch thick will take 20 to 30 minutes to bake at 400°F, reaching the safe internal temperature of 165°F.
Many home cooks struggle with dry, overcooked chicken because they don’t account for variables like breast thickness, bone-in versus boneless cuts, or whether the meat starts frozen. The difference between a juicy dinner and a rubbery disappointment often comes down to timing and technique. Understanding these factors will help you cook chicken breasts correctly every time.
This guide covers everything from precise baking times for different types of chicken breasts to practical steps for preparing and cooking your meat. You’ll learn how to check for doneness without cutting into the breast, ways to keep your chicken moist during baking, and nutritional information to help with meal planning.
Exact Baking Times for Chicken Breasts at 400°F
 Boneless chicken breasts require 20-30 minutes at 400°F, bone-in pieces need 35-45 minutes, and frozen breasts take 30-45 minutes depending on thickness.
Boneless Skinless Chicken Breast Timing
Small boneless chicken breasts weighing 4-6 ounces take 20-25 minutes to bake at 400°F. Medium-sized breasts between 6-8 ounces need 25-30 minutes of cooking time.
Large breasts weighing 8-10 ounces require the full 30-35 minutes in the oven. The thickness of your chicken matters more than weight—pieces around 1 inch thick cook faster than those measuring 1.5 inches or thicker.
Use a meat thermometer to check when the internal temperature reaches 165°F. Insert the thermometer into the thickest part of the breast to get an accurate reading.
Start checking your chicken at the 20-minute mark to prevent overcooking. Thinner cuts can finish cooking in as little as 15-20 minutes.
Bone-In Chicken Breast Baking Duration
Bone-in chicken breasts take longer to cook than boneless cuts because the bone affects heat distribution. Plan for 35-45 minutes of total baking time at 400°F.
The bone acts as an insulator, slowing down the cooking process in the meat closest to it. Check the temperature near the bone, as this area takes the longest to reach 165°F.
Bone-in breasts typically weigh more than boneless cuts, adding to the extended cooking time. A standard bone-in breast requires approximately 10-15 minutes more than a boneless piece of similar size.
Monitor the chicken starting at 35 minutes to gauge doneness. The meat should no longer be pink near the bone when fully cooked.
Baking Frozen Chicken Breasts
Frozen chicken breasts need 30-45 minutes at 400°F, which is roughly 50% longer than thawed chicken. Add 10-15 minutes to your standard cooking time when working with frozen pieces.
Frozen breasts should not be marinated or seasoned beforehand since the ice prevents proper adhesion. Season the chicken after the first 15-20 minutes when the surface begins to thaw.
The edges may cook faster than the center when baking from frozen, creating uneven doneness. Check the internal temperature in multiple spots to ensure the entire breast reaches 165°F.
Thawing chicken in the refrigerator before baking produces more consistent results and better texture. If you must bake frozen chicken, increase your monitoring frequency to prevent overcooking once the meat begins to thaw.
Essential Factors That Impact Baking Time
 The time required to bake chicken breast at 400°F varies from 15 to 40 minutes depending on thickness, bone content, oven accuracy, and whether the meat starts frozen or thawed. Understanding these variables ensures you cook the meat to 165°F internal temperature without drying it out.
Chicken Breast Thickness and Weight
Thickness matters more than weight when baking chicken breast at 400°F. A half-inch thick breast needs 15-20 minutes, while a one-inch thick piece requires 20-25 minutes.
Breasts measuring 1.5 inches or thicker take 25-30 minutes or longer. Standard boneless skinless chicken breasts weigh 6-8 ounces but vary significantly in thickness across the piece.
You should pound thicker portions to create uniform thickness throughout each breast. This prevents thin edges from overcooking while thick centers remain undercooked. Use a meat thermometer inserted into the thickest part to verify doneness rather than relying on weight or appearance alone.
Bone-In Vs. Boneless: Time Differences
Bone-in chicken breasts require 5-10 minutes longer than boneless cuts at 400°F. The bone acts as an insulator that slows heat transfer to surrounding meat.
Boneless skinless chicken breasts of average thickness bake in 20-25 minutes. Bone-in breasts of similar size need 35-40 minutes when baking chicken breast at 400°F. You must check the temperature near the bone, where meat takes longest to reach 165°F.
The bone also helps retain moisture during cooking, making bone-in cuts slightly more forgiving if you slightly exceed the target temperature. Metal pans conduct heat faster than glass or ceramic, which can reduce total cooking time by several minutes regardless of bone content.
Oven Calibration and Equipment
Many home ovens run 25°F hotter or cooler than the displayed temperature. An oven thermometer reveals whether your appliance maintains accurate 400°F heat when baking chicken at 400°F.
Dark-colored metal pans absorb and transfer heat faster than light-colored or glass baking dishes. This difference can reduce cooking time by 3-5 minutes for the same chicken breast.
Overcrowding the pan creates steam instead of dry heat, extending baking time and preventing proper browning. Leave space between each piece to ensure hot air circulates evenly around all surfaces of the meat.
Starting Temperature: Thawed Versus Frozen
Baking frozen chicken breast at 400°F increases cooking time by approximately 50% compared to thawed meat. A frozen one-inch thick breast needs 30-38 minutes instead of the standard 20-25 minutes.
Chicken brought to room temperature for 15-30 minutes cooks more evenly than meat straight from the refrigerator. Never leave raw poultry at room temperature for more than two hours.
Frozen chicken often cooks unevenly, with the exterior reaching 165°F while the interior remains undercooked. The outside may also become dry and tough before the center finishes cooking. Thawing completely in the refrigerator overnight produces superior results when baking chicken breast at 400°F.
Step-by-Step Guide: How to Bake Chicken Breasts at 400°F
 Baking chicken breasts at 400°F requires proper preparation, precise timing, and adequate resting to achieve moist results. The entire process takes 25-30 minutes from start to finish, including a 5-minute rest period.
Preparing Chicken Breasts
Start by patting the chicken breasts completely dry with paper towels, as excess moisture prevents browning. Place each breast on a cutting board and cover with plastic wrap or parchment paper.
Pound the thicker portions with a meat mallet until the breast reaches an even thickness of about 3/4 inch throughout. This ensures the meat cooks at the same rate and prevents dry edges while the center finishes cooking.
Season both sides with salt, pepper, and any additional spices you prefer. Brush lightly with olive oil or melted butter to promote browning and add flavor. Let the seasoned chicken sit at room temperature for 10-15 minutes before baking, which helps it cook more evenly.
Preheating and Arranging for Even Cooking
Set your oven to 400°F and allow it to fully preheat for at least 15 minutes. Line a rimmed baking sheet with parchment paper or aluminum foil for easier cleanup.
Arrange the chicken breasts on the prepared pan with at least 1 inch of space between each piece. Crowding the pan traps steam and leads to steaming rather than baking, which produces less appealing texture.
Place the pan on the center rack of your oven for optimal heat circulation. Avoid using the top or bottom racks, as they can cause uneven cooking or excessive browning on one side.
Baking Process and Monitoring
Bake for 20-25 minutes depending on the size of your chicken breasts. A 6-ounce breast typically requires 20-22 minutes, while an 8-ounce breast needs 22-25 minutes.
Insert an instant-read thermometer into the thickest part of the breast at the 20-minute mark. The internal temperature must reach 165°F for safe consumption according to USDA guidelines.
Check the temperature without opening the oven door repeatedly, as this drops the internal temperature and extends cooking time. If the chicken hasn’t reached 165°F, continue baking and check every 2 minutes until done.
Resting for Juicy Results
Remove the baking sheet from the oven once the chicken reaches 165°F. Transfer the breasts to a clean plate or cutting board immediately to stop the cooking process.
Tent the chicken loosely with aluminum foil and let it rest for 5 minutes before slicing. During this period, the internal juices redistribute throughout the meat rather than spilling onto your cutting board.
The internal temperature will rise an additional 3-5 degrees during resting, but this carryover cooking won’t dry out the meat if you’ve removed it at the correct temperature.
Optimizing Moisture and Flavor
 Two proven methods protect chicken from drying out during the 22-26 minute bake at 400°F: applying seasoning blends that create a flavorful crust and using salt-based solutions to lock in moisture.
Marinating and Seasoning Techniques
Marinating chicken breast for 30 minutes to 2 hours infuses flavor while adding protective moisture to the meat’s surface. Acid-based marinades containing lemon juice, vinegar, or yogurt break down proteins slightly, creating a tender texture when baked. Oil-based marinades work differently by coating the meat and preventing moisture loss during high-heat cooking.
You can apply dry rubs directly before baking for a quicker option. Mix salt, pepper, garlic powder, and paprika as a basic blend that enhances the natural chicken flavor. The salt in dry rubs draws moisture to the surface, creating better browning at 400°F.
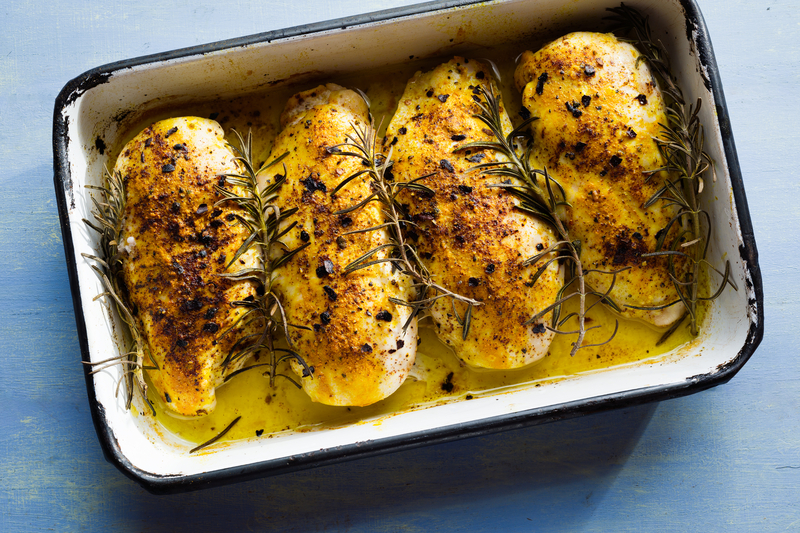
Brush melted butter or olive oil on the chicken before adding seasonings to help spices stick and add richness. Fresh herbs like rosemary, thyme, or oregano contribute aromatic oils that remain potent throughout the baking process.
Brining for Extra Juiciness
Brining involves soaking chicken breast in saltwater for 15-30 minutes before baking. The salt solution changes the protein structure, allowing meat fibers to hold onto water during cooking. Use 1/4 cup of salt per 4 cups of cold water for an effective brine ratio.
A quick brine prevents the common problem of dry, overcooked edges that can occur even when the center reaches 165°F. The absorbed liquid provides a buffer against moisture loss at high temperatures. Pat the chicken completely dry after brining to ensure proper browning in the oven.
You can add sugar, peppercorns, or bay leaves to the brine for additional flavor layers. Cold brining works best since warm water can encourage bacterial growth before cooking.
Checking Doneness and Avoiding Dryness
The internal temperature of baked chicken breast at 400°F determines safety and quality, while specific techniques prevent moisture loss during cooking.
Using a Meat Thermometer
Insert a meat thermometer into the thickest part of the chicken breast to check for an internal temperature of 165°F. This USDA-recommended temperature ensures harmful bacteria are eliminated while the meat remains safe to eat.
Digital instant-read thermometers provide the most accurate readings within seconds. Avoid touching bone if cooking bone-in chicken breasts, as this gives a false high reading.
Check the temperature after 20 minutes for small breasts (4-6 oz) or 25 minutes for medium pieces (6-8 oz). Remove the chicken from the oven immediately when it reaches 165°F, as carryover cooking will continue raising the temperature by 5-10 degrees during the resting period.
Common Mistakes to Avoid
Cutting into the chicken to check doneness releases essential juices that keep the meat moist. This creates dry, less flavorful results compared to using a thermometer.
Skipping the 5-10 minute rest after removing chicken from the oven causes juice to run out when sliced. The resting period allows muscle fibers to relax and reabsorb moisture throughout the meat.
Baking chicken breasts straight from the refrigerator leads to uneven cooking, with a dried exterior and undercooked interior. Let the chicken sit at room temperature for 15-20 minutes before baking.
Overcrowding the baking pan traps steam around the chicken, preventing proper browning and creating a rubbery texture instead of a golden exterior.
If you’re looking for simple, reliable bakeware, the Rachael Ray Nonstick Bakeware Set (3-piece) is an easy win for everyday cooking. Made from durable steel with a nonstick coating, these baking sheets heat evenly and release food effortlessly, making cleanup quick and stress-free.
In the kitchen, they’re especially handy for roasting meals like chicken breasts, as well as vegetables, potatoes, salmon, sausages, and even frozen foods like fries or nuggets. Just season, place them on the tray, and bake—no sticking, no hassle. The flat surface helps the chicken cook evenly, while the nonstick finish keeps everything intact when serving.
Add in the comfortable grip handles and three different sizes, and you’ve got a versatile set that works just as well for cookies as it does for weeknight dinners. Simple, practical, and dependable—exactly what most home cooks need.
Nutrition and Serving Suggestions
 Baked chicken breast provides lean protein with minimal fat, making it a nutritious choice for various meal plans. You can pair it with different sides to create balanced meals that fit your dietary needs.
Chicken Breast Nutrition Facts
A 3-ounce serving of baked chicken breast contains approximately 165 calories and 31 grams of protein. The same serving has about 3.6 grams of fat, with only 1 gram coming from saturated fat.
Baked chicken breast provides essential vitamins and minerals your body needs. You get significant amounts of B vitamins, particularly niacin and B6, which support energy metabolism. The meat also contains selenium, phosphorus, and zinc.
Chicken breast is naturally low in carbohydrates with zero grams per serving. The protein content supports muscle maintenance and helps keep you full longer. When you bake chicken instead of frying it, you avoid adding extra calories from oil or breading.
Serving and Pairing Ideas
You can slice baked chicken breast and add it to Caesar salad or mixed greens with vegetables. The protein pairs well with roasted vegetables like broccoli, carrots, or Brussels sprouts for a simple dinner.
Serve the chicken alongside quinoa, brown rice, or sweet potatoes for a filling meal. You can also dice the meat and use it in tacos, pasta dishes, or grain bowls.
For sandwiches, place sliced chicken on whole grain bread with lettuce, tomato, and mustard. The mild flavor works with different cuisines, from Mediterranean dishes with olive oil and herbs to Asian-inspired meals with stir-fried vegetables. Store leftover chicken in the refrigerator for up to four days to use in meal prep throughout the week.