

Grilling fish doesn’t have to end with half your dinner stuck to the grates. Many home cooks avoid grilling fish because they worry about the delicate flesh tearing apart or leaving a mess on their grill. The good news is that a few simple adjustments to your technique can solve this problem completely.
The key to preventing fish from sticking is creating a barrier between the fish and the grill grates through proper oiling, ensuring your grill is clean and preheated to the right temperature, and choosing fish varieties with firmer flesh that hold up better during cooking.
Fish sticks because of its delicate texture and lack of protective fat, which causes the proteins to bond directly to metal surfaces when exposed to heat.
This guide walks you through every step of the grilling process, from selecting the best fish varieties to mastering the flip. You’ll learn how to prepare both your fish and your grill, what tools make the job easier, and the exact techniques that professional grill masters use to get clean releases every time.
Why Does Fish Stick to the Grill?
 Fish sticks to the grill due to protein bonding with metal surfaces, inadequate heat preventing proper searing, and debris on grates creating adhesion points.
Protein Structure and Lean Texture
Fish contains delicate proteins that form chemical bonds when they contact hot metal grill grates. The proteins undergo a process where they literally fuse to microscopic pores and irregularities in the grate surface. Lean fish varieties like tilapia, cod, and flounder are especially prone to sticking because they lack sufficient fat content to create a protective barrier during cooking.
Firmer fish like salmon, tuna steaks, and swordfish contain higher oil content that helps prevent direct protein-to-metal contact. The fat acts as a natural lubricant between the fish flesh and the grate. Fish with less structural integrity breaks apart more easily when you attempt to flip it, compounding the sticking problem.
Heat and Surface Contact
Insufficient grill temperature allows fish proteins to bind with the grate instead of searing quickly. You need temperatures between 400-450°F to trigger the Maillard reaction, which creates an instant crust that releases naturally from the grate. When the grill runs too cool, the fish essentially steams rather than sears.
The fish cooks on its own seared crust rather than directly on the metal when proper heat is applied. This rapid surface cooking prevents those protein bonds from forming with the grate. Placing fish on a cold or moderately warm grill gives proteins time to chemically attach before any protective crust develops.
Grate Cleanliness and Condition
Old food particles and burnt-on residue create a rough, sticky surface that grabs fish proteins. These carbonized bits act like glue, forming additional contact points where your fish can adhere. Even a clean-looking grate may have microscopic debris that causes problems.
Rust, pitting, and wear on older grill grates increase surface irregularities where proteins can lodge. A smooth, well-maintained grate provides fewer opportunities for fish to stick. The absence of an oil coating leaves bare metal exposed, allowing direct protein-to-metal bonds to form during cooking.
Choosing the Right Fish for Grilling

Select fish with firm flesh and higher fat content to prevent sticking and falling apart on the grill. Skin-on fillets provide a protective barrier that makes flipping easier and helps retain moisture during cooking.
Ideal Fish Types for Grilling
Swordfish, tuna, and mahi-mahi stand out as the best options because their dense, meaty texture holds up under high heat. These fish have a steak-like quality that resists flaking when you flip them.
Salmon, mackerel, and Arctic char work well due to their natural oil content. The fat acts as a built-in barrier against drying out and creates natural lubrication between the fish and grill grates.
Halibut and grouper offer firm white flesh that maintains its structure during grilling. These fish work best when cut into thicker portions of at least one inch.
Fish to approach with caution:
- Sole
- Tilapia
- Flounder
- Cod (unless very thick cuts)
These varieties have delicate, flaky textures that require extra care or alternative cooking methods.
Handling Delicate Versus Firm Fish
Firm fish require minimal special handling and can go directly on clean, oiled grates. You can flip them once without worry about breakage.
Delicate fish benefit from a grill basket or cedar plank to prevent direct contact with grates. These tools eliminate the sticking problem while still delivering smoky flavor.
Cut delicate fish into larger portions rather than small pieces. Bigger cuts hold together better and give you more surface area to work with when flipping.
Consider skewering cubed delicate fish for kebabs. This method gives you control and prevents pieces from slipping through grates.
Benefits of Grilling Fish with Skin
Skin creates a natural protective layer between the delicate flesh and hot metal grates. It holds the fillet together during cooking and prevents it from breaking apart.
The skin side should face down first on the grill. This positioning allows the skin to crisp up while shielding the meat from direct heat.
Grilled fish skin becomes crispy and flavorful when cooked properly. Many people discard it, but properly prepared skin offers texture and taste.
The fillet often releases cleanly from the skin when cooked, leaving the skin stuck to the grates. This makes removal simple and gives you a clean piece of fish on your plate.
Preparation Before Grilling
 Proper fish preparation creates the foundation for successful grilling by removing surface moisture, adding protective oils, and ensuring even cooking temperatures. These three steps take less than 15 minutes but make the difference between fish that sticks and fish that releases cleanly.
Patting Fish Dry
Surface moisture creates steam when fish hits the grill, which prevents the proteins from forming a proper sear. Use paper towels to press firmly on all sides of the fish until no wetness remains on the surface. Remove the fish from refrigeration 15-20 minutes before grilling and pat it dry again right before oiling, as additional moisture will accumulate as it sits.
Wet fish will stick to grill grates because the water prevents direct contact between the protein and the metal needed for proper searing. The drier the surface, the faster a crust forms that naturally releases from the grates.
Oiling and Seasoning the Fish
After drying, brush all sides of the fish with a high-smoke-point oil like avocado oil (520°F), grapeseed oil (420°F), or canola oil (400°F). Apply a thin, even layer that coats the entire surface without pooling or dripping.
Season immediately after oiling so the salt and spices adhere to the oil layer. Salt helps draw out any remaining surface moisture and improves crust formation during cooking. Apply seasonings generously, as some will be lost during handling and grilling.
Bringing Fish to Room Temperature
Cold fish placed on a hot grill creates uneven cooking, with the exterior overcooking before the interior reaches proper temperature. Let fish sit at room temperature for 15-20 minutes after removing it from the refrigerator.
This temperature adjustment allows the fish to cook more uniformly across its thickness. The center will reach 145°F internal temperature without burning the outside or requiring extended grill time that increases sticking risk.
Preparing the Grill to Prevent Sticking
A properly prepared grill creates the foundation for fish that releases cleanly from the grates. The three critical preparation steps involve removing residue, reaching optimal temperature, and creating a barrier between metal and protein.
Cleaning the Grill Grates
Dirty grates with carbonized food particles create rough surfaces that trap fish proteins. Use a stiff wire brush or grill scraper to remove all debris while the grates are still warm from the previous cooking session.
For stubborn buildup, heat the grill for 10-15 minutes to burn off residue, then brush thoroughly. Clean grates should show visible metal between the rods without black crusty spots.
Inspect your grates after cleaning to ensure no wire bristles remain stuck in the metal. These bristles pose a safety hazard and create additional points where fish can catch.
Preheating for Proper Searing
Heat the grill to 400-450°F before placing fish on the grates. This temperature range allows proteins to form a crust that naturally releases from the metal rather than bonding to it.
Preheat for at least 10 minutes with the lid closed to ensure even heat distribution across all grates. You should not be able to hold your hand 5 inches above the grates for more than 2-3 seconds at proper temperature.
The initial contact between hot metal and cold fish creates an immediate sear. This rapid protein coagulation prevents the fish from sinking into grate grooves where it becomes trapped.
Applying Oil or Non-Stick Coatings
Apply oil to both the grates and the fish itself for maximum protection. Use oils with smoke points above 400°F such as grapeseed (420°F), avocado (520°F), or refined coconut oil (450°F).
Fold a paper towel into a thick pad, grip it with long-handled tongs, dip it in oil, and wipe it across the hot grates in smooth strokes. The oil should shimmer but not smoke excessively.
Reapply oil to the grates immediately before placing fish and again before flipping. Non-stick grilling sprays containing lecithin provide an alternative, but apply them to cool grates to prevent flare-ups, then reheat before cooking.
Essential Tools and Accessories
 The right equipment creates a barrier between delicate fish flesh and hot grill grates while making flipping and handling easier. Fish spatulas, grilling baskets, and alternative cooking surfaces each solve the sticking problem through different methods.
Best Spatulas for Fish
A fish spatula features a thin, flexible blade that slides easily under cooked fish without tearing the flesh. The blade typically measures 6-8 inches long and includes slots or perforations that allow grease to drain while lifting.
Metal construction works best since plastic spatulas melt at high grill temperatures. Look for a spatula with an angled offset between the blade and handle, which gives you better leverage when working close to hot grates.
Using two spatulas simultaneously provides the most control when flipping whole fish or large fillets. Position one spatula under each end of the fish, then lift and turn in one smooth motion to keep the piece intact.
As we said a proper fish spatula makes all the difference. This kitchen utensil duo includes a large fish turner and a small metal spatula, both designed with ultra-thin slotted edges that slide easily under delicate foods like fish fillets, eggs or pancakes without tearing them.
The stainless steel construction makes them rust-resistant and durable for frequent cooking, and the ergonomic non-slip handles feel comfortable even when your hands are wet. Both pieces are dishwasher safe for simple cleanup, and the seamless one-piece steel design prevents grease or food from getting trapped.
Using Grill Baskets or Trays
Grilling baskets trap fish between two hinged wire racks, allowing you to flip the entire basket instead of handling the fish directly. The ventilated design still exposes fish to direct heat and smoke while preventing contact with grill grates.
Perforated metal trays sit flat on the grill and support fish from underneath without enclosing it. These work well for smaller pieces or delicate varieties that break apart easily. Oil the basket or tray thoroughly before adding fish to prevent new sticking points.
Both tools require preheating on the grill for 2-3 minutes before adding fish. The hot surface sears the fish immediately, which helps develop a crust that releases more easily after cooking.
Benefits of Cedar Planks and Foil
Cedar planks infuse fish with mild wood smoke while the fish cooks on top of the plank rather than directly on grates. Soak planks in water for at least one hour before grilling to prevent burning and create steam during cooking.
Heavy-duty aluminum foil creates a disposable cooking surface when formed into a tray with raised edges. Poke small holes in the foil to allow smoke penetration and fat drainage while still protecting fish from direct grate contact. This method sacrifices some grill marks but eliminates sticking entirely.
Grilling Techniques for Perfect Results
 The difference between fish that releases cleanly and fish that tears apart comes down to proper placement, timing, and avoiding rushed decisions during cooking.
How to Place Fish on the Grill
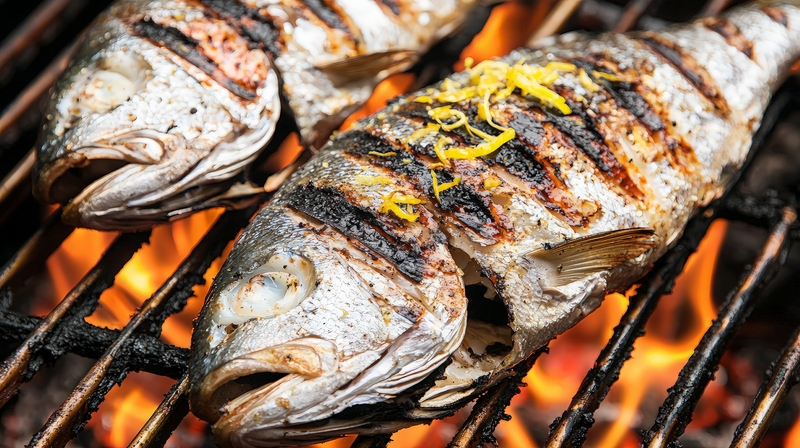
Position your fish on the hottest part of clean, well-oiled grates at a 45-degree angle to the grill bars. This creates professional-looking crosshatch marks and reduces contact points where sticking occurs.
For fillets with skin, place them skin-side down first. The skin acts as a protective barrier between delicate flesh and metal grates.
Press down gently for 2-3 seconds when you first place the fish to ensure even contact with the grates. Space multiple pieces at least 2 inches apart to maintain consistent heat circulation and prevent steam buildup that can cause sticking.
Use two metal spatulas or fish turners to support both ends when transferring fish from plate to grill. This prevents the fillet from bending or breaking during placement.
Timing and Flipping Without Sticking
Cook fish for 4-5 minutes per side for fillets one inch thick, adjusting time proportionally for thicker or thinner cuts. Your fish needs to reach 145°F internal temperature to be safely cooked.
When the fish is ready to flip, it will release naturally from the grates with minimal resistance. If you attempt to lift it and feel resistance, wait another 30 seconds before trying again.
Flip only once during the entire cooking process. Multiple flips increase your chances of tearing the fish and losing moisture.
Insert your spatula at a shallow angle under the thickest part of the fillet first, then slide toward the edges. Support the entire piece with a second spatula before rotating in one smooth motion.
Common Mistakes to Avoid
Moving fish too early accounts for most sticking problems you’ll encounter on the grill. Resist checking or adjusting position during the first 3-4 minutes of cooking.
Grilling on inadequately preheated grates prevents proper searing. Your grill needs 10-15 minutes of preheating time to reach optimal temperature.
Skipping the oil on either the fish or grates eliminates the non-stick barrier you need for clean release. Apply oil to both surfaces every time.
Using a cold fish fillet straight from the refrigerator creates uneven cooking and increased sticking. Let your fish sit at room temperature for 15 minutes before grilling.
Choosing overly delicate fish like flounder or sole for direct grilling leads to inevitable breakage. Save these varieties for grilling baskets or cedar planks instead.