How Hot Should the Pan Be for Steak? The Perfect Temperature for a Perfect Steak
Getting a hot enough pan is the key to cooking a great steak at home. Too cool and your steak will steam instead of sear. Too hot and you’ll burn the outside before the inside cooks properly.
Your pan should reach between 400°F and 500°F (204°C to 260°C) for a proper sear.
This temperature range creates the dark, flavorful crust that makes restaurant-quality steak so appealing. The high heat triggers a chemical reaction called the Maillard effect, which develops complex flavors and textures on the meat’s surface.
This guide covers everything you need to know about pan temperature for steak. You’ll learn why the right heat matters, how to test if your pan is ready, which cookware works best for searing, and how different factors affect your cooking approach.
Why Pan Temperature Matters for Steak
The temperature of your pan directly affects whether you get a flavorful crust or an overcooked, gray exterior. Proper heat control creates the chemical reactions that make pan-seared steak taste better.
The Role of High Heat in Searing
A pan heated to 400°F to 500°F creates immediate contact between the meat and the cooking surface. This rapid heat transfer forms a crust on the outside of the steak while keeping the interior at your target doneness level.
When you place steak on a pan that’s too cool, the meat releases moisture instead of searing. This moisture creates steam that prevents browning and leaves you with a boiled texture rather than a proper sear. The steak also sticks to the pan surface because proteins haven’t had a chance to form a crust.
High heat also reduces cooking time. A properly heated pan sears each side in 2-3 minutes for medium-rare, which means less time for heat to penetrate deep into the steak.
Understanding the Maillard Reaction
The Maillard reaction occurs when amino acids and sugars in the meat’s surface break down under heat above 300°F. This chemical process produces hundreds of new flavor compounds that don’t exist in raw beef.
You can identify the Maillard reaction by the brown crust that forms on searing steak. This crust tastes different from the interior meat because the chemical changes create savory, complex flavors. The reaction happens quickly at temperatures between 400°F and 500°F but barely occurs below 300°F.
The color change from red to brown signals that new molecules have formed on the meat’s exterior. These molecules add depth to the beef’s natural taste and create textural contrast between the crispy outside and tender inside.
The Ideal Pan Temperature Range for Steak
Your pan needs to reach 400-450°F (204-232°C) for proper steak searing, with variations depending on the cut’s thickness and fat content.
What Does ‘Screaming Hot Pan’ Mean?
A screaming hot pan refers to a cooking surface that reaches the point where water droplets instantly vaporize on contact. This occurs at temperatures between 400-450°F for most heavy-bottomed pans like cast iron or stainless steel.
You’ll know your pan has reached this temperature when it begins to shimmer slightly and any oil added starts to produce wisps of smoke. The term comes from the intense sizzling sound a steak makes when it hits the surface at this heat level. This temperature range creates the Maillard reaction, which develops the brown crust on your steak’s exterior.
Medium-high burner settings typically produce this heat after 5-7 minutes of preheating. Cast iron pans maintain this temperature better than thinner cookware because they retain heat even after you add cold meat.
Recommended Temperature Range by Cut
Filet mignon requires 375-400°F because its tenderness and low fat content cook faster than other cuts. The lower end of the temperature range prevents the exterior from burning before the interior reaches your target doneness.
New York strip performs best at 425-450°F due to its moderate fat marbling and thicker profile. The higher heat renders the fat cap properly while creating a substantial crust. Steaks between 1-1.5 inches thick need the full 450°F range, while cuts under 1 inch should stay closer to 400°F to avoid overcooking.
Bone-in cuts require an additional 25°F reduction from these ranges because the bone conducts heat differently than muscle tissue.
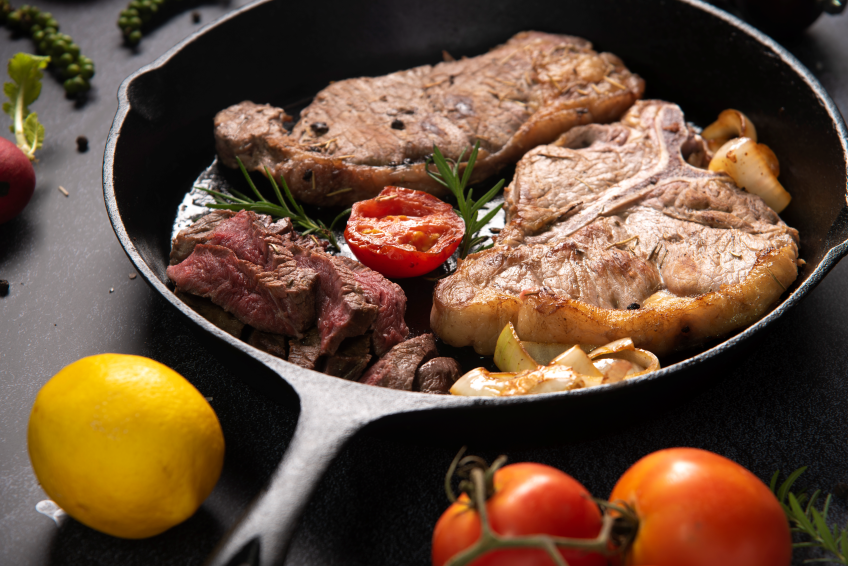
Choosing the Right Pan for Searing Steak
The material of your pan determines how evenly heat distributes and how well your steak develops a crust. Heavy-bottomed pans made from cast iron or stainless steel work best for pan-seared steak because they retain high temperatures needed for proper searing.
Cast Iron vs. Stainless Steel
Cast iron skillets excel at heat retention, maintaining steady temperatures of 400-500°F even when you place cold meat in the pan. This property lets you cook steak on the stovetop with consistent results. The porous surface of cast iron creates an excellent sear when properly seasoned.
The Lodge Cast Iron Pre-Seasoned Skillet is a versatile and durable kitchen tool. Known for its even heat distribution and retention, this skillet is perfect for a wide range of cooking methods, including use in the oven, on the stove, on the grill, or over a campfire.
Stainless steel pans heat up faster than cast iron and respond quickly to temperature changes, giving you more control during cooking. They distribute heat evenly across the cooking surface without hot spots. Stainless steel works well with acidic ingredients if you plan to make a pan sauce after searing.
The Misen 5-Ply Stainless Steel Pan is designed for superior cooking performance with its five layers of stainless steel and aluminum, ensuring excellent heat retention and even heat distribution.
This 10-inch pan offers a larger cooking surface, making it ideal for searing, sautéing, and other high-heat cooking techniques.
Both materials handle the high heat required for searing without warping or degrading. Cast iron needs regular seasoning maintenance, while stainless steel requires no special care beyond normal cleaning.
Why Avoid Nonstick Pans
Nonstick coatings break down at temperatures above 400°F, releasing harmful fumes and losing their effectiveness. The temperatures needed to sear steak properly will damage the nonstick surface permanently.
These pans also prevent the Maillard reaction from occurring properly because they create a barrier between the meat and the heat source. You need direct metal-to-meat contact for developing the flavorful brown crust that makes pan-seared steak appealing.
Nonstick surfaces cannot withstand metal utensils or aggressive scraping needed to develop fond, the caramelized bits that form the base of pan sauces.
How to Preheat and Test Your Pan
Preheating a pan to the right temperature requires 3-5 minutes over medium heat, and you can verify readiness using the water droplet test or an infrared thermometer reading of 500°F for steak.
How to Preheat Effectively
Place your empty cast iron or stainless steel pan on a burner set to medium heat. Match the burner size to your pan’s base, or rotate the pan every minute if using a smaller burner to distribute heat evenly.
Heat the pan dry for 3-5 minutes without adding oil. This allows the entire cooking surface to reach an even temperature, preventing hot spots that cause uneven browning.
Once the pan reaches the target temperature, add your oil and wait until it shimmers or just begins to smoke. For steak, you need a surface temperature around 500°F to create a proper sear.
You can also preheat in a 500°F oven for more even heat distribution. Place the cold pan in a cold oven, set it to 500°F, and once it reaches temperature, carefully transfer the pan to high heat on your stovetop using thick, dry oven mitts.
Simple Methods to Check If the Pan Is Hot Enough
The water droplet test gives you a quick visual confirmation. Flick a few drops of water onto the pan surface—if the droplets instantly form beads that roll around and evaporate within 1-2 seconds, your pan is ready.
An infrared thermometer provides the most accurate reading. Point it at the pan’s surface to get an instant temperature measurement, aiming for 500°F before adding your steak.
Visual cues also work for experienced cooks. The pan should appear slightly lighter in color from the heat, and you’ll feel strong heat radiating when you hold your hand six inches above the surface.
Factors Affecting Pan Temperature Choice
The temperature you need for your pan depends on how thick your steak is and how done you want it cooked. These two factors determine both your starting heat and whether you’ll need to adjust the temperature during cooking.
Effect of Steak Thickness
Thicker steaks require a different approach than thin cuts when it comes to pan temperature. A 1-inch steak cooks well at 400-450°F because the heat penetrates to the center while building a crust on the outside. Steaks measuring 1.5 inches or more need a slightly lower starting temperature of 375-425°F to prevent the exterior from burning before the inside reaches your target temperature.
For cuts thicker than 2 inches, you should sear at 400°F for 2 minutes per side, then reduce heat to 300-350°F or transfer to a 350°F oven to finish cooking. This two-stage method prevents a charred outside with a raw center. Thin steaks under 3/4 inch thick need the highest heat of 450-500°F because they cook through quickly and benefit from rapid crust formation.
Desired Doneness and Adjusting Heat
Your target doneness level changes how you manage pan temperature throughout the cooking process. For rare steak (internal temperature 130-135°F), maintain high heat at 450-475°F for the entire cooking time since the brief exposure creates a crust without overcooking the interior. Medium-rare requires starting at 425-450°F and potentially reducing to 375-400°F if the outside browns too quickly before reaching 135-140°F internally.
Medium and medium-well steaks benefit from starting at 400-425°F, then lowering to 325-375°F after the initial sear to allow heat penetration without surface burning. You can also move the pan to a cooler burner or finish in a 350°F oven once both sides are seared. Well-done steak needs the most careful heat management: sear at 400°F for 90 seconds per side, then drop to 300-325°F to slowly bring the center to 160°F without creating a dry, tough exterior.
Step-by-Step Guide to Cooking Steak in a Hot Pan
Cooking steak on the stovetop requires proper preparation, precise heat control during searing, and butter basting to develop a golden crust while maintaining a juicy interior. The process differs slightly based on the cut you choose.
Prepping the Steak
Remove your steak from the refrigerator 30 minutes before cooking to bring it to room temperature. This ensures even cooking throughout the meat.
Pat both sides completely dry with paper towels. Surface moisture prevents proper browning and creates steam instead of a crust.
Season generously with kosher salt and black pepper, pressing the seasoning into the meat so it adheres during cooking. New York strip and ribeye benefit from heavier seasoning due to their larger surface area, while filet mignon requires a lighter touch because of its delicate flavor.
Select a 1 to 1.5-inch thickness for optimal results. Thinner cuts overcook quickly, while thicker cuts may burn on the outside before reaching the desired internal temperature.
Searing Techniques for Different Cuts
Preheat your cast iron or stainless steel pan over medium-high heat for 5 minutes until it reaches approximately 400-450°F. Add 1 tablespoon of high-smoke-point oil like vegetable, avocado, or grapeseed oil.
Place the steak in the pan and press down gently with tongs to ensure full contact with the cooking surface. Sear without moving for 3-4 minutes until a deep brown crust forms and the meat releases easily from the pan.
Flip once and cook the second side for 3-4 minutes for medium-rare, 4-5 minutes for medium, or 5-6 minutes for well-done. Filet mignon requires shorter cooking times due to its tenderness and lower fat content, while marbled cuts like ribeye need slightly longer to render the internal fat properly.
Check doneness by making a small cut in the thickest part or using a meat thermometer (125°F for rare, 135°F for medium-rare, 145°F for medium).
Finishing Touches: Basting with Butter
Add 4 tablespoons of butter and 4 sprigs of fresh rosemary or thyme to the pan during the final minute of cooking. Tilt the pan slightly so the melted butter pools to one side.
Use a large spoon to continuously scoop the butter and pour it over the top surface of the steak. This technique adds rich flavor while creating a glossy finish on the crust.
The aromatics infuse the butter as it browns, creating a compound that penetrates the meat’s surface. Continue basting for 45-60 seconds, ensuring the butter reaches all areas of the steak.
Transfer the steak to a plate and pour the remaining rosemary butter over the top. Rest for 2-3 minutes before serving to allow the juices to redistribute throughout the meat.
Resting and Slicing for Optimal Results
After cooking your steak to the right temperature, resting allows juices to redistribute while proper slicing technique preserves texture and moisture.
Why Resting Matters
Pull your steak off the heat and place it on a cutting board or plate for 5 to 7 minutes. During this period, the internal temperature rises by a few degrees before stabilizing.
Juices pushed toward the center during cooking need time to move back through the meat fibers. Cutting too early causes liquid to run onto the plate instead of staying in each bite.
Tent the steak loosely with foil if you prefer, but it’s not required. The surface will stay warm enough to serve.
How to Slice Against the Grain
Look at the muscle fibers on your steak’s surface to identify which direction they run. The grain refers to these parallel lines of muscle tissue.
Position your knife perpendicular to these fibers and cut across them. This shortens the muscle strands, making each piece easier to chew and more tender.
Slicing with the grain leaves long fibers intact, which creates a tougher eating experience even on well-cooked meat. Use a sharp knife and cut into strips about ¼ to ½ inch thick for best results.

 Getting a hot enough pan is the key to cooking a great steak at home. Too cool and your steak will steam instead of sear. Too hot and you’ll burn the outside before the inside cooks properly.
 The temperature of your pan directly affects whether you get a flavorful crust or an overcooked, gray exterior. Proper heat control creates the chemical reactions that make pan-seared steak taste better.
 Your pan needs to reach 400-450°F (204-232°C) for proper steak searing, with variations depending on the cut’s thickness and fat content.
 The material of your pan determines how evenly heat distributes and how well your steak develops a crust. Heavy-bottomed pans made from cast iron or stainless steel work best for pan-seared steak because they retain high temperatures needed for proper searing.
 The temperature you need for your pan depends on how thick your steak is and how done you want it cooked. These two factors determine both your starting heat and whether you’ll need to adjust the temperature during cooking.
 Cooking steak on the stovetop requires proper preparation, precise heat control during searing, and butter basting to develop a golden crust while maintaining a juicy interior. The process differs slightly based on the cut you choose.
 After cooking your steak to the right temperature, resting allows juices to redistribute while proper slicing technique preserves texture and moisture.


